
How to Sew Your Own Cabinet Curtains
Give your kitchen a cozy, vintage look with easy-to-make cabinet curtains! This step-by-step guide shows you how to create curtains for cabinets, including those with drawers.
Last year we scored some awesome (new) kitchen cabinets at the Restore!

We installed them on the wall of our kitchen that once stood empty and added a laminate countertop to them.
I just love how practical they are. But, I’m also more than slightly embarrassed to admit that we’ve been using them for almost a year without any doors or drawer fronts on them! (Except the one that came with drawer fronts… Hallelujah!)
Every time I stop in at the Restore, I check their supply of drawer fronts and doors. I know that eventually the right size will come in. The cost savings is worth the patience to wait…
But, as we wait for the perfect doors, I thought it was time to do something with this space. Open cupboards in this situation isn’t my preference!
The drawers on the top presented my biggest challenge. Having to slide over a curtain to open the drawer was not going to work for us. So, here is my unorthodox solution – making fabric curtains for doors – with a drawer pull!!
Materials Needed for Cabinet Curtains for a Cupboard with a Drawer on Top
Disclosure: The following contains affiliate links for your shopping convenience.
- Fabric – You’ll need to calculate the finished length you desire and add extra to it for the rod pocket and hem at the top. And then you’ll calculate the finished width and times it by 2 for the width. Use whatever fabric you choose. I had some leftover painter’s dropcloth that resembles canvas and linen fabric that I used. (You can find details for how to sew a rod pocket curtain here.)
- Grommets (Make sure you get the size of grommets you’ll need to accomodate the shaft of your drawer pull.
- A scrap piece of wood that would be the same measurement of a drawer front.
- A rod to hang the curtain on. (I used this type of inexpensive curtain rod wire and hooks.)
- A drawer pull. Mine were antique pulls I found in an old dresser, but here are similar drawer pulls with rings.

How to Make Cabinet Curtains with a Drawer Pull
Here are the steps I used to create these custom cabinet curtains with a drawer pull.
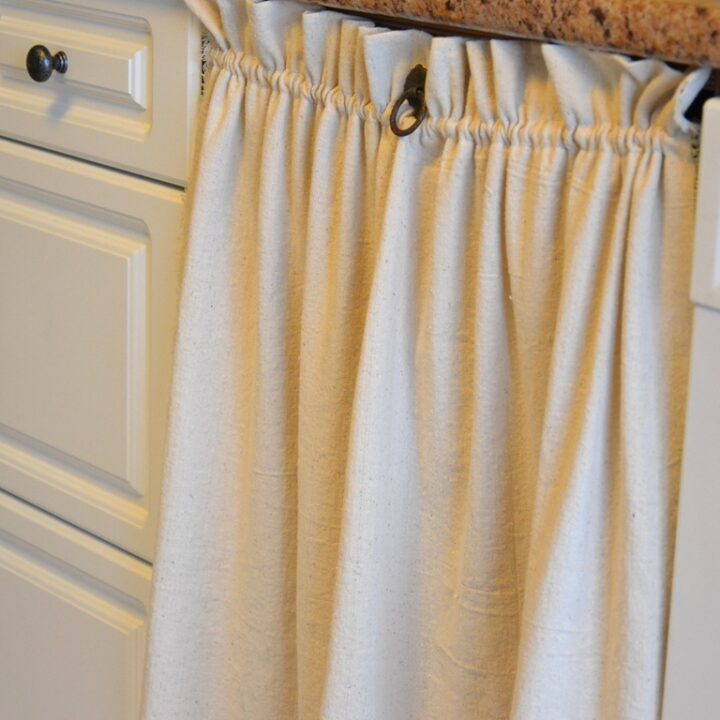
- I sewed a normal curtain with a header – out of painter’s drop cloth. The bottom was hemmed with a traditional rolled hem. However, when I made the rod pocket at the top, I didn’t make a perfect hem on the back. I just ripped the edges and left them raw. I like that look and it makes it less bulky on the rod.
2. I measured the center point of the finished sewn curtain and cut a little hole in it (where the drawer pull would be situated) and tried to insert a grommet. (I discovered that I only have half of the grommet apparatus, so I have to get a few more supplies when I go to town… Let’s just pretend that I actually have a completed grommet in it, O.K.? Thanks…)

3. My husband attached a scrap board on the drawer front. We attached the curtain to it, and then the antique drawer pull.

A simple wire curtain rod systme isn’t bulky on a cupboard.

Inserting the drawer pull right through the cabinet curtain makes the system function well.
I just love how the old antique pull is a piece of history nestled right into the fabric…


And voila! No more pans to see!
PS. We never did add traditional doors to those cupboards. When we moved from that house years ago, those fabric cupboard doors were still going strong!!
More Simple Kitchen Renovation Ideas:
- See the whole before and after budget small kitchen remodel here.
- Check out some of the best colors for small kitchens
- Here are some clever storage ideas for small kitchens
- DIY pendant light for above the kitchen sink (made out of a bowl!)
How to Make Cabinet Curtains with a Drawer Pull
Give your kitchen a cozy, vintage look with easy-to-make cabinet curtains! This step-by-step guide shows you how to create curtains for cabinets, including those with drawers.
Materials
- Fabric – You’ll need to calculate the finished length you desire and add extra to it for the rod pocket and hem at the top. And then you’ll calculate the finished width and times it by 2 for the width. Use whatever fabric you choose. I had some leftover painter’s dropcloth that resembles canvas and linen fabric that I used. (You can find details for how to sew a rod pocket curtain here.)
- Grommets (Make sure you get the size of grommets you’ll need to accomodate the shaft of your drawer pull.
- A scrap piece of wood that would be the same measurement of a drawer front.
- A rod to hang the curtain on. (I used this type of inexpensive curtain rod wire and hooks.)
- A drawer pull. Mine were antique pulls I found in an old dresser, but here are similar drawer pulls with rings.
Tools
- Sewing machine
- Grommet Setter
- Screwdriver
- Saw
Instructions
- Measure and cut your fabric to the specifications for the cabinet you'll be covering with a curtain.
- Sew the rod pocket curtain. Measure the center point of the curtain where you want the drawer pull to be located and insert a grommet in that spot (through both pieces of the rod pocket curtain).
- Insert the curtain rod into the rod pocket below the drawer pull grommet.
- Cut a scrap board to the measurements of the drawer front (if you don't have a drawer front) and attach it to the drawer.
- Attach the curtain rods on each end of the drawer front using screws.
- Insert and attach the drawer pull.


I have the same situation going on with my cabinets and I LOVE this DIY! The curtains and the grommlet, I understand but could you tell me how you made the rod? I am now following you on Pinterest!
Very pretty! Added the perfect touch to the space. Thanks for linking!